
Preparing a Sheet for Upload
Depending on whether you are adding new products or updating existing, there are slightly different requirements on what must be included, which will be detailed in the relevant process breakdowns below.
But for all uploads, there are some basics to keep in mind:
- The first row will be taken as the column headers
- Each row after that will represent one product
- Each column represents a piece of information about your products (eg. Product Name, Description etc.)
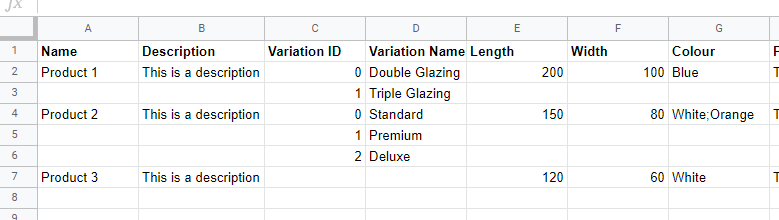
Your sheet should look something like this:

Note: The bulk uploader will accept bot .CSV and other excel file formats such as .XLS but we strongly recommend using .CSV
Minimum Requirements
There are some minimum requirements for columns to be included depending on whether you are adding new products or updating existing.
New Products
- Product Name
- Product Description
- Category ID (If all your products are going to be in the same category, you can leave this out and provide this during the upload process instead)
Existing Products
- Product ID - Once a product has been added to SpecifiedBy, it is assigned a unique ID number. By including this, we know which products you are referring to in your updates, and you otherwise only need to include the columns for the properties you wish to update.
For example, if you simply wanted to add a new certification to all of your products, you could just upload a sheet with two columns - Product ID and Certifications.
General Data Requirements
There are some simple rules to follow which will ensure your data is uploaded without any problems.
- For numeric properties, such as Width, only include the number. If you add any units, it will be rejected. If your Width is in mm, then you will match it to the ‘Width (mm)’ property during the upload process.
- For properties which may have multiple inputs, such as Colour for example, simply separate each value with a semicolon (eg. Blue;Green;White)
- For properties which are a statement of fact, which is usually represented as a ‘checkmark’ on SpecifiedBy (eg. CE Marking), you can use either TRUE or FALSE, or Yes or No.
- Some properties are standardised, and require you to use one of a limited number of options available (such as Colour).
You can find details of all standardised properties here .
Product Variations (Optional)
One feature of SpecifiedBy which you may be using, or wish to use, is to provide variants of a single product within the one listing.
This simply means that on a single product listing page, in the specification properties section, there may be different options for the user to view.
For example, a window provider may have double and triple glazed version of the same product, which will alter some of the performance properties:

To make use of this feature when using the bulk uploader, we need to include a couple of additional columns and arrange the sheet in a certain format.
We will need to include the following columns:
- Variant ID
- Variant Name
Variant ID helps to link the connected product details together. The original, standard or default variant should always be assigned a Variant ID of 0. And each subsequent variant after that assigned the next sequential number - 1,2,3 and so on.
Variant Name is then what you wish to call each of these which will be displayed to users, as per the Double and Triple Glazed example above.
In terms of formatting the sheet, each variant should be placed in the rows directly below the standard version, without the need to repeat the product ID product name, description or Category IDs, all of which will be taken from the original products row.
If you are using variants, your sheet should then look something like this:
If you are including a mix of products with and without variants, you can leave the Variation ID and Variation Name blank for those which don’t require them.
Adding New Products
Prepare your CSV file to upload, as per the requirements outlined about.
On the Bulk Uploader page, click ‘Start New Import’ to begin the process.
Once prompted on whether you are adding New products or updating Existing, pick the ‘New’ option and then press continue.
You will then be asked whether all the products will be in the same category or in multiple categories - both of which are handled slightly differently.
Single Category
Single is the most straightforward. If you pick this option, then you will simply be asked to select the Category which all products will fall into. This means there is no need to include a Category ID in your product upload sheet.
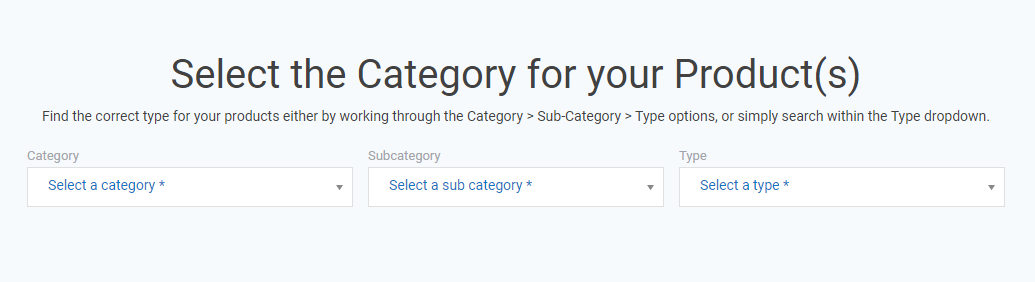
You can either work sequentially through Category > Sub-Category and Type, or simply search in Type, select the most appointed option, and this will backfill Sub-Category and Category.
Once this is complete, press Continue.
Multiple Categories
For an upload of New products which will sit within multiple different categories, we need to know which Category each individual product belongs to.
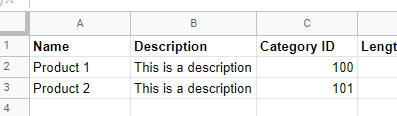
To this, we need to include a Category ID column in your sheet, and add the relevant ID number for each product in the corresponding row within the sheet.
This will look something like this:
Before you can do that, you obviously need to know the ID number for each category you need to reference.
To do this, you have two options:
Option 1 - use the online Category picker
Once you select Multiple and press continue, you will see the same category picker tool as you would with the Single option. But in this scenario, each time you find a relevant category, you will be shown the corresponding Category ID to add to your sheet, like this:

You would then work through finding each relevant category, making a note of the Category ID, and then adding these to your sheet for upload.
Option 2 - export our Category ID sheet
Alternatively, you can export a list of all of our Categories and IDs and find the corresponding information you need.
There is a link to download this within the tool, or you can do so here.
Secondary Categories
If you want your products to be included in a second category on the site, add another column to your sheet called Secondary Category ID, and follow the same steps as above, adding the relevant Category ID number for each product.
Upload Your File
Whether you are adding products in a single category or multiple, the next step will be to upload your file.

Simply click the ‘Choose File’ button and locate the relevant file on your computer (making sure that you have all the correct and required information, as detailed above), and then press continue.
Note: There is a checkbox option below the upload file which is not relevant to New products, so make sure to leave this unchecked. We will explain the purpose of this in regards to updating existing products.
Match Properties
The next step is to match the columns in your spreadsheet to the relevant product properties on SpecifiedBy.
So once you have uploaded your file, we will show you all the column headers we found in your sheet (taken from the first row), and ask you to match these with SpecifiedBy properties.
In many cases, we are able to automatically match your columns based on the name (for example if you use ‘Name’ as a header, we will automatically match this to ‘Product Name’), saving you some time.
This means that you should typically see two ‘tables’ of Headers and Properties one with all the automatically matched columns, and one with all the columns we could not match which need to be done manually.

For the automatically matched columns, you can still change these with the dropdown if you think the matching is inaccurate.

For the Unmatched Columns, you simply need to open the dropdown for each one and locate the relevant property to match it with.
Alternatively, you can choose to Ignore any column, and therefore not import the data:

The Bulk Uploader will not allow you to continue until all columns have either been matched, or ignored.
But you also have the option to ‘Ignore all remaining unmatched columns’ by checking this box:
This means, for example, if you had 20 unmatched columns but you only want to include 5 of them you could simply match those 5 and then click ‘Ignore all…’ for the remainder, meaning you don’t have to manually apply this to the remaining 15 columns.
You will also not be allowed to continue and will receive a relevant warning, if the basic required columns have not been matched.
Once you have completed this process, press continue to submit your sheet for final processing.
Waiting Room
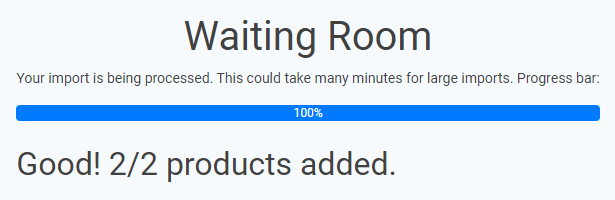
The final step will be that you enter a ‘waiting room’ whilst the data is processed, product by product. Depending on how big the file is (ie. how many products and how many columns), this could take a few minutes.
This process is running in the background though, so you are free to navigate away from this page whilst it is processing.
In most cases though, it should process pretty quickly.

Once processing has completed you will be provided with the outcome, which will either be:
- Completed - all products and all data was successfully uploaded
- Completed with errors - 1 or more products had errors, so could not all be uploaded
- Failed - it was not possible to upload any data
Each product is treated independently so if you have 50 products and 1 had errors, the other 49 should still upload, meaning that you only need to fix and re-upload the single affected product.
But if there is a single error with a single column for a product, no data for that product will be uploaded.
Ideally, you will end up with a successful upload. Once you do, clicking Finish will return you to the main Bulk Uploader page, where you will find a history of all your previous imports.
Updating Existing Products
Making updates to existing products work very similar to adding new products, with just a couple of important variations in regards to your upload sheet - specifically, we need to include each Products unique ID so we know which products to make changes to.
The simplest way to get started with updating existing products is to export all the existing data directly from SpecifiedBy, and make your changes directly within that sheet.
You can access this export in a couple of places:
On your Manage Products page

Or within the Bulk Uploader tool itself after you have picked the ‘Existing’ option:

The sheet you export from SpecifiedBy will look something like this:

As you can see, each product has a Product ID number associated with it, and there will be a column for every property associated with your products.
As mentioned above, the simplest approach is to make your changes directly within this sheet and re-upload it once ready, but in theory, you can simply take all your ID’s and create a new sheet with new headers.
Once your sheet is ready, press continue to move to the Upload stage.
Upload Your File

As with adding New products, simply click the ‘Choose File’ button and locate the relevant file on your computer (making sure that you have all the correct and required information, as detailed above).
Before pressing continue, we need to decide whether to check the ‘Ignore Blank Values’ option or not:

This helps the system to understand how to deal with blank values in your sheet. For example, one product may not have a value in the ‘Width’ column, like this.

So we need to know how to interpret that, in the scenario where this product (Product 1) does currently have a width added.
If you check this box, you are telling the system to completely ignore any blank values in your sheet.
This means that nothing will happen to any existing data where there is a blank.
So if Product 1 already has a Width of 100 on SpecifiedBy, if you upload this sheet with the ‘Ignore blank Values’ box ticked, it will still have a Width of 100 afterwards. The blank is ignored.
If the box is left unchecked, the default approach, the system takes the latest sheet upload to be the ‘source of truth’, which means you are telling us that Width should not have any value for this product.
In this case, the existing width of 100 will be wiped.
Once you have decided on this and you press continue, you will go through the same Column Matching and Waiting Room steps as outlined above for the process of adding New products.
If you need any help or support with this process, please get in touch with us on [email protected]